A couple of weeks ago I was a vender at a local Faire. One of the benefits is that you get to meet interesting folks who share a wealth of wisdom from their experiences. One particular item was the Swedish Log Candle which was news to me. Of course, any topic with fire interests me because firecraft is my specialty. In this case, it’s not a fire making method, but more akin to a campfire method. It all begins with a seasoned log and a chainsaw.
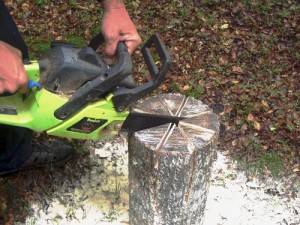
 First, stand the log upright and begin to cut downward using 4 overlapping cuts in the same way that you would cut a pie, creating 8 equal triangles. Each cut can be made as low as 4 inches from the bottom. Some suggest that you can use the chainsaw blade tip to cut slightly lower at the junction of cuts, thus creating a shallow well at the bottom.
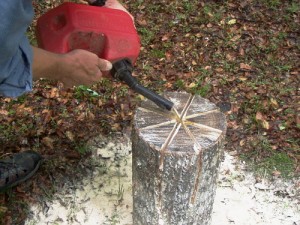
 Next, you need an accelerant such as kerosene, lamp oil, or lighter fluid to use as a fire starter or primer. Because I’ve already used my chainsaw, I also have the accompanying mixed gasoline, which works very nicely. Just pour the fluid down the middle of the cuts, wetting each wedge tip in the process, then let it soak for a minute or so. Be sure not to stand over the log when you light it, but stay off to the side, lighting it with an outstretched hand.
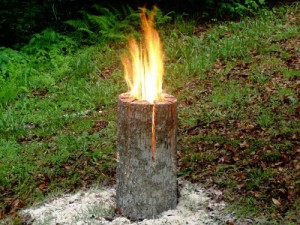
 After a slight “poof” of flame, the fire slowly begins to grow, starting slender then broadening outward. The edge of the wedge acts as kindling which sustains the process. As with all campfires, the quality and type of wood will determine the speed and brightness of the flame along with the duration of burn time. With appropriate cookware and suspension, this could be used for cooking, or with supervision and safe surroundings, it could be used decoratively at your next event. In any case, it’s a fun experience and well worth the time and effort to make.


Ken, I got this example a few years ago from a Pathfinder leader in southern Oregon. I have used it with great sucess many times for outdoor meetings along the edges of our outdoor church. Had 8 going at once with a bonfire at the side. Great fun. I’m on facebook and pictures are in my albums of “academy days”
Have been spreading this example for a few years now ! God Bless — richard
I absolutely love this log candle!!! I’ll be showing it to my Grandkids and Great- grandkids but I’ll surround it with rocks for safety!!!
This is amazing. I can’t wait to try.
Thanks, Ken. You can also split the log with an axe, put the pieces back together leaving some space between them, then build a small fire on top. The coals drop down and ignite the inside of the log. For cooking, a pot can be placed directly on top. In Scandinavia they use this method for building fires in the snow.
Good input Kevin. I’ve recently learned of yet another method of construction by bundling equal length wrist sized dry kindling by wrapping it at a lower level with vines while placing tinder in the middle toward the top to lite. In each case the fire is elevated off the ground and fosters a usable fire within. Thanks for sharing.
I love this ideal..can’t wait to try it. Thanks for posting!
Cant wait to try it. would be fun for the grand kids
I have a magazine for loggers here in NH, i think my readers would love this idea, i would like to place this article in my magazine if possible. thanks…Mike Doolan
Thanks for asking Mike… yes, that would be great. Please include credits.
Had some big branches knowcked down by Sandy. Now I know how to use them. Thanks
Ive done this using leftover wax from large candles as a fuel. Works well
I like the idea of the log but frown on accelerant as its dangerous. I would try putting fat wood in the middle or something else. I also like the idea of a candle, kindling or branches to start it. If using an accelerant its dangerous and many people have been severely burnt that way.
I love this and can hardly wait to try it, if we ever have our burn ban removed here in Texas. About how long would a log like the one pictured be expected to burn?
I did not let it burn completely that day, but I would imagine 45 minutes to an hour.
I love this idea and can’t wait to try it! Thanks…
This is an awesome idea! I’m from northern Oregon but currently live in Colorado. This would be great to cook up some fish in my trusty cast iron skillet this spring/summer.
I WAS IN THE bOY sCOUTS IN 1943 AND THEY HAD A DEMO OF THAT AND I WONDERED HOW THEY DID THAT THANKS FOR THE MEMORY!!!
@Kevin McGee I agree. I saw the technique used in Norway, when I attended a Boy Scout jamboree in 1975.
Awesome! Can’t wait to try this!!!
I love the idea, love fires and this is great, I will secured the bottom with rocks and sand around to be on the safe. Thanks
I cannot WAIT to get back to my Swedish ROOTS!
Unless you have a ripping chain in your saw, good luck with the cuts. Also, how do you keep the log from flying sideways? Is it in the ground a few feet?
I had no trouble cutting down the log. It had a flat bottom and is in itself very stable. Perhaps splitting the log and regrouping the wedges would work better in your case, however, that would be less stable in the end.
I saw something very similar on Facebook a few months ago. It was presented as a one log cooking stove! They used tightly packed newspaper stuffed into the cracks and formed a wick, this way it can be prepared ahead or stored for emergencies.
Love this idea, can, t wait to try it, thanks
Never use gasoline it will blow up when you ignite it. Use diesel instead. But never Gasoline, I know from experience it is very dangerous!!!!!
I used gasoline in this illustration. Let it sit for a few minutes first, and don’t flood it, just douse the edges in the center. Diesel would work well, but gasoline when used sparingly is not deadly… use discretion.
there is also another method I was shown a few years ago. if you can find a dead tree, pine in northern bc is what I have used. you cut an 18 inch block off and if the tree has been dead for a couple of years it willhave 5 to 6 inches of rot in the center and be quite dry. clean out the rot from the center with a stick or axe handle, it usually comes out fairly easy. light a small campfire and place the block upright with the hole on top of the fire. the fire will work its way up the center of the log, in a short while the flame will reach through the top and burns like a large candle, hence this is the famous “Yukon Candle”, Rob.
I cannot use a chainsaw. So I thought something less aggressive for myself and also my wife to use would be a bandsaw. I know that the cut on a bandsaw is smaller, but I wouldn’t see how that should cause any issue when lighting the log.
Thanks.
Yeah i can see this one ending in the paper…people getting burnt or fires being set You might want to point out that it should be placed on a flat bit of ground (unlike your third picture)Suggest maybe a hole a couple inches deep the circumference of the log,then packed hard ito the ground with soil and/or stones. When you put flammable liquid on the log you don’t want it running out down he side of the log
what if we were to take the stump of some trees already gone and used them would it not work the same and take care of the stump problem while having a campfire too
Easier way to do this. Take three pieces of round wood a minimum of five inch diameter. Tie them together with a piece of wire. Start fire in the bottom. This one works exactly the same as the one shown here. It was shown to me about 1950 by the Sweadish Boy Scouts at a Jamboree. It will not fall apart. It will glow and provide fine heat for cooking. They can be snuffed out and reused. It is better because it has less reflective surfaces and was designed and used to save wood.
I have an idea, if you are scared of gasoline, dont use it. If you cant use a chainsaw, dont do this project. If you want to tell others how their project isnt safe after they just showed that it is, leave the site.
If available pine knots are a great ignition source.
love it can’t wait to try it
Don’t try this on stumps. Runs the risk of starting a subterranean root fire!
(former USAF Firefighter)
We did it with wood wedge chisel and baconn grease down the crack, but i had to put sterno gel on top to get it going when i tried to show friends.Log needs to be aged at least a year
Accolades to Kevin McGee for posting the original, non-petrol-based method that the Swedes actually use. More accolades for giving that information in a positive and courteous manner. This fellow must be a gentleman. I wish the internet was full of such.
chainsaw oil works great if you are afraid of gas……
I make my own sterno cans. I take an empty tuna can, then cut cardboard as wide as the can is deep. Peel the cardboard and roll the corrigated piece and put it in the can. Keep doing that until you fill the can tightly with the cardboard. Melt candle wax and let it cool,then pour it in the can with the cardboard until you fill it to the edge.
If you have an empty metal gallon paint can, you can clean it out, turn it upside down and poke holes around the outside of the can. If you light the sterno can, then set the paint can over it, you now have a homemade cooking stove.
You can also use the sterno cans to start camp fires, then dig the cans out of the ashes and dispose of them.
I should have mentioned, once you pour the melted wax in the cans, you have to let them cool until they are dried completely before transporting them. These cans can be used several times for cooking or heating things up, but only once to help start campfires. I hope this was helpful. I learned this in the scouts 40 years ago.
Lots of good ideas here. As always common sense and safety goes a long way when dealing with fire!
Good idea
Great idea. I will try it.
Cool but I like Claudia’s idea…no gasoline, LOL. And no chain saw!
When making this pack the accumulated sawdust from the cuts back into the log and that is the accelerate to get your fire started…
The danger of using gasoline varies with the local conditions and surroundings. Gasoline that is allowed to vaporize in grass makes a bomb that will ignite with explosive force. Same with brush. Please do not use gasoline. I can name several ones who did this and ended up with 3rd degree burns. You can be burned through your clothes from heated air and if wearing short pants or shirts serve burns from a very small gas fire.