 In my area Winter has not yet surrendered to Spring as evidenced by the snowfall earlier this week. During the previous snow my snow shovel’s metal edge plate had worn through to the point that the rivets began to fall out, one after the other. The shovel became unusable. It was time to improvise a repair.
I had a metal strip that came from a door sweep. I removed the rubber blade from it and cut it to the same width as the shovel then drilled holes to match the shovel’s existing rivet holes. As road conditions were “iffy” and my wallet was thin, I didn’t want to spend the effort or expense to purchase a rivet gun and rivets so I decided to make my own. It would be a bifurcated rivet, a design implementing a split shaft.
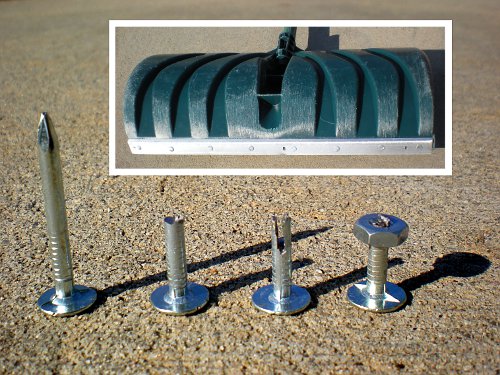
I happened to have roofing nails that have a very wide head yet thin enough to allow close contact between the shovel and walkway. Standard washers were too large for fastening at the end of the rivet so I used a machine nut instead that would fit snug.
The first step was to cut the nail to the proper length. I used a vice-grip pliers to hold the nail while I used a hacksaw to cut about two thirds of the way through the shank, then I bent the end back and forth until it broke off. When it broke, it left a tiny lip on the tip that worked in my favor for the next step.
I rotated the vice-grips ninety degrees to hold the nail cut end upward. I used the hacksaw to cut down the nail shank about one quarter inch. The tiny lip helped to hold the hacksaw blade in position to get a good start.
The next step was to insert the nail from the bottom of the shovel up through the metal strip and shovel blade. I could place the nut on the end of the nail and tap it down with a hammer. By spanning the jaws of the vice-grip I could place it on top of the nut surface but missing the nail core so that I could tap the nut down tight onto the shovel blade.
The final step was to separate the two halves of the compressed split end so that the nut was secured into place. I used a flat blade screw driver with a hammer to accomplish that. The process was repeated for each rivet.
I was able to finish the shoveling task with my repaired shovel and I’m happy to say that the rivets are still holding solid. You might find other applications for this type of rivet. It might be the right solution in a future emergency situation.