 This method of cooking takes a little effort but has big advantages. While teaching a class on primitive and emergency cooking I
discussed variations in campfires and cooking hearths. While coals are preferred for direct contact cooking, flames work best when using containers such as pots, pans, and skillets. The day was breezy and we began the class by building a conventional campfire using the lean-to approach. Fortunately the breezes were light and actually enhanced the fire process. Windy weather could have made this process more difficult and certainly more dangerous. In another 45 minutes or so we would have our needed coals.
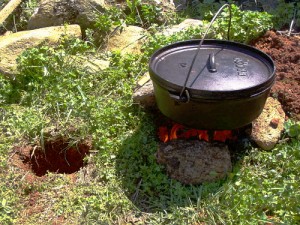
Next, we dug a Dakota Hole that consists of 2 holes about 8″ in diameter, each about 1′ deep, and separated by 10″. At the bottom of each hole a tunnel is dug to connect them. The finished Dakota Hole is “U” shaped and a fire is built in one side. The heat that is generated by the fire draws air into the other hole which begins a chimney effect and sustains the fire. Because the fire is below ground level, it is protected from windy weather and is more contained and thus safer. For persons who want their presence to be less visible, this is also a more stealthy fire. Another variation can be dug along an earthen bank, entering from the bank side and connecting with a hole dug from the top level.
After the initial campfire had burned down into a bed of coals we built the fire in the Dakota Hole. This process is quite simple and quick. You begin by placing large kindling in the hole in a funnel orientation then add smaller kindling in the middle. Place tinder on top of that then lite. It burns down nicely. Once established it can be controlled by partial closure of the air intake hole. You can place a tripod over the fire and suspend a pot for cooking. I chose to put 3 rocks around the hole’s edge to act as a trivet over which I placed a dutch oven. This orientation allows air flow with access to feed the fire with kindling.
As with all campfires, safety precautions should be observed. In addition, choose soil that is free from hummus or other ignitable material. You may want to place visual markers or a barricade around the hole to prevent accidentally stepping into it or you can temporarily place large rocks over the holes when not in use. When completely finished at the campsite, make sure the coals are completely extinguished and fill in the entire Dakota Hole.
Now is a good time to obtain a folding spade for your camping gear or Bug-Out-Bag and give this cooking fire a try.


