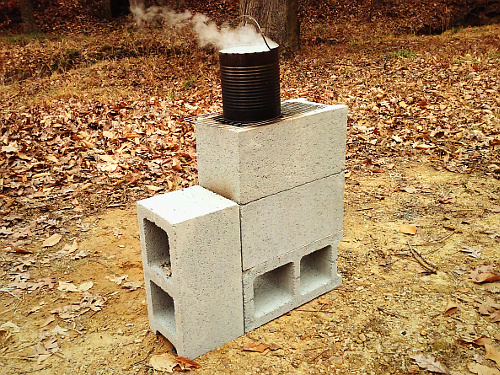
 There have been a number of rocket stoves featured on various social media websites including different configurations using concrete blocks. One particular configuration used only four blocks that made it a very simple and inexpensive project so I decided to assemble one for myself.
This project called for three standard two-hole blocks and one mid-hole block with the single hole in the middle with open holes on each end. I went to a local hardware superstore and was surprised that they did not have the mid-hole block that I sought so I decided to buy four blocks and I would remove the outer end of one of the blocks in order to make it work. The total cost of the material was $7.03.
When I returned home I got a hammer and cold chisel and set about chipping away the outer end of one of the blocks. I tried to create a break-line along the inner edge. The concrete was resistant to chiseling so I decided to just use the hammer and chip it away in the same fashion as I would do for flint knapping. Rather than just smacking the wall mid-way I began to chip the upper edges, alternating sides and bit by bit reduced the concrete down toward the block center. I then flipped the block over and repeated the process until the wall was completely removed. Now the block was ready to assemble into the rocket stove configuration.
Click Photo To Begin Animation
It is important to allow air-flow out of the top hole so whatever is placed on top must not obscure it. A gas stove burner grate placed on top would be ideal to support a pot or pan. Alternatively three stones placed around the block rim would elevate the pot or pan sufficiently. A simple metal drying rack could be used to grill meat or vegetables.
In the end this project was successful. When not in use you could use cap blocks to cover the top and put potted plants on them to make it serve another purpose and be somewhat decorative for your yard while not in use as a stove. When the power goes out this could be a real asset for boiling water and cooking your meals.