| |
| |
|
Outdoor Cooking comforts the soul and makes food more safe to eat, not to mention makes the food taste oh-so-good!
Cooking falls into some basic categories: Baking, Boiling, Frying, Grilling, and Steaming . Heat can either be applied directly or indirectly. I prefer the “low and slow” approach which means using a lower temperature and a longer cook time… that way food tends to be more thoroughly cooked, and flavors will have a chance to blend more completely.
|
|
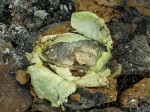
Baking Fish In Clay
Baking fish goes back to the beginning of history. Not only is it simple, but baking takes advantage of almost the entire fish as a food resource. Start with a gutted fish and add seasoning inside and out. Wrap fish in leaves… cabbage leaves work well, then cover with 1/2 to 3/4 inches of clay. Place the clay bundle on coals and place coals on top of the bundle as well. When the clay is dry and hardened, pull out of the coals and break open. The skin and meat should separate easily with a fork when done. For more details, check out my blog on Baking Fish In Clay.
|
|
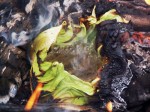
Boil Water In A Cabbage Leaf
Did you know that you can use a cabbage leaf like a pot in which to boil water?. One of the wonderful properties of water is that it holds a steady temperature at 212 degrees Fahrenheit which is lower than the combustion point of it’s container. This amazing property has the effect of protecting the vessel that contains it so fire will not burn through the barrier that holds it. While being heated, containers like a cabbage leaf or a paper cup may burn down to the level of the water so it becomes a one-use container.An alternate method of boiling water would be to put dry rocks into a fire and heat them until very hot, then using a pair of tongs, transfer them into the water to heat it. It may take several rocks, but eventually it can be made to boil. For more details, check out my blog on Boil Water In A Cabbage Leaf.
|
.
|
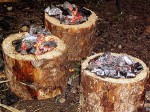
Camp Craft – Making Bowls
No china in the woods? Why not make a bowl for your meals?! By resting hot coals on a log, you can carefully burn a hollow that will hold your vittles. The same method can be used to make a spoon. I prefer chopsticks.
|

|
Coal Roasted Egg
If you had no vessel to cook with, how could you cook an egg? Although eggs are normally cooked by frying or boiling, they can be roasted as well. Remembering an explosive cooking incident in my microwave, I knew that pressure would build up inside when heated so I punctured a few holes in the shell and then set the egg on top of ash covered coals. I occasionally turned the egg during the roasting process to evenly cook the innards. For more details, check out my blog on Coal Roasted Egg.
|
.
|
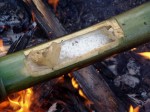
Cooking with bamboo
You can use bamboo as a cooking vessel. You can cook using a segment in either the horizontal or vertical position. The horizontal position uses an open slot on top of the middle segment filled with rice and water in a 1:2 ratio. The adjoining segments are several inches long with the bottom halves cut off in order to hang on the tops of two posts enabling it to straddle a fire. The vertical method uses a single segment cut open at one end where rice is poured into a broad leaf such as a banana leaf and folded into a packet and dropped down inside. Once the tube is filled with water, the segment is placed upright in coals. It can be supported on the side by a rock or other device.
|
|
Hoe Cake Cooking
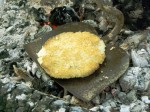
Back in the pre-Civil War days, slaves worked out in the fields using hoes to do their work. At mid-day, there was no “break-room” in which to eat, so the workers made their own corn bread out in the fields by using a hoe blade which they placed on some red-hot coals. By mixing corn meal, water and a little salt while using a little bacon fat or butter on the blade, they baked a very quick and tasty meal. When you add water to the corn meal, make a fairly wet dough and gently form a patty with your hands. Place the dough patty on the hoe blade and cook on both sides until each side is slightly browned or golden. Check out my blog “Hoe Cake Cooking” for more info.
|
|
Poplar Leaf Cooking
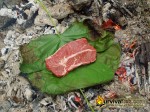
This cooking method uses poplar leaves that interlock, thus making a griddle type surface upon which you can cook thinly sliced meat or other raw food items over coals. As the leaves can smother the coals, sure to shift the leaf platform occasionally to other hot spots to maintain the needed heat. Alternatively, you can place small parallel sticks like rails on top of the coals to allow air flow, thus keeping the embers alive. My rule of thumb for cooking is to cook about two thirds through the first side of meat, then flip it over to the other side on a new set of interlocked leaves to finish cooking. For more details, read my blog on Poplar Leaf Cooking.
|
|
Dutch Oven cooking
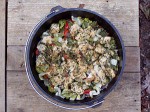
There is something special about Dutch Oven cooking… the flavors are wonderfully blended, and the outdoor aroma of smoke and food are great. Cut all pieces appropriately sized for a cook time of 45 minutes at 375°F.
|

|
Solar cooking
A growing trend for cooking, especially in under-developed countries, is by using solar technology. Solar cooking takes time, but requires no fuel or flames. Heat is collected from the sun’s rays and enhanced by reflection, magnification, insulation, and absorption. You can use items that found in the trash. I used a silverized bag from a snack food and an empty soda can. You can open the bag and form a reflective bowl, and in the center, place a dark, heat absorptive soda can in which to heat water or food. I often keep packets of flavoring from Top Ramen meals to create a nice bullion soup. Read more from my blog “Solar Soup Scenario”
|
|

|
2 Minute Stove For $1
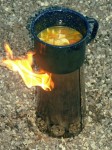
As illustrated in my video, you can make this alcohol stove in only 2 minutes, using an empty soda can and a knife. This type of stove is called a chimney stove, because the air that enters through the lower holes creates an updraft inside the can and accelerates the flame. The best fuel to use is Denatured Alcohol because it burns clean and complete. I used the 70% Isopropyl Alcohol in the video for 2 reasons: Cost; and because most people have it in their medicine cabinet. You can also use 50% Isopropyl Alcohol, but these Isopropyl Alcohols tend to be sooty and leave liquid behind after the flame expires.
Using liquid fuels can be hazardous, and the design of this style burner can be tipsy, so it would be prudent to do it outdoors, or, if indoors, perhaps set it inside a pan or tray in the event it should tip over. I invert an empty coffee can over the stove and cover it in order to extinguish it. Also, when you first light the stove, let it burn for a little bit so that the device can heat up before you place a cup or pan on top.
|
|
TrailStove cooking
Recently I discovered a terrific little camp stove called the “TrailStove”. It uses the chimney effect to maximize airflow for combustion of fuel. If you have used a charcoal briquette starter that uses newspaper placed in the bottom chamber of the device to ignite the charcoal briquettes placed inside the upper chamber, you know how this stove works. The stove can be also used with other fuels such as alcohol burners. This stove is very efficient, and there is virtually no need to carry fuels as there is wood and other cellulose available for fuel in most places that you would hike or camp. I use an over-sized cup as my cooking vessel that I place on top. Because of my positive experience with this stove, I have chosen to carry this in Survialtek’s Store, as I believe it is a great product to use, and durable for a lifetime. Visit my store to order your own!.
|
|
Engine cooking
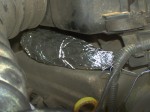
This is a unique cooking method from decades ago… cooking food on a car’s engine. This concept has always intrigued me, and I knew that I had to try it. It seems that aluminum foil is the container of choice, although tin cans work too, but vented and usually surrounded by foil to inhibit taking on any engine taste and to prevent spills. There will be variations in temperature within the engine compartment, and can be used strategically for the miles/time of your travel. I found 2 places on my engine and placed foil wrapped cobs of corn (still in their husks) on each side of the engine. I drove to an out-of-town seminar covering about 50 miles in mixed traffic. I carefully removed the food bundles. To my delight, the corn was great! For more details on this method, see my blog Miles for Dinner – Engine cooking.
|
|
Cooler Cooking
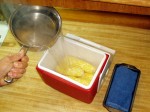
Here’s another instance of an old technology using new resources. The old method of using a hay box to cook food has seen variations over time. Essentially, food is heated in a vessel, then left in an insulated enclosure to hold the heat for hours while the contents cook. Next time you want to serve corn-on-the-cob to guests, you can shuck as many cobs of corn as needed and lay them inside the cooler on the bottom, then cover them with boiling water and close the lid. After about 30 minutes they’re ready, but they can stay in the water much longer as needed. Refrigerated food should be allowed to warm up to room-temperature before loading for best results. For more details on this method, see my blog Cooler Cooking.
|
|
Plastic Bottle Cooking
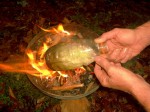
Did you know that you can boil water and cook food using a plastic bottle? First, build a small campfire for cooking, then cut small pieces of veggies and raw meat and place them inside a wide mouthed Gatorade bottle and fill it about half way with water. Hold the open bottle by the neck over the fire using both hands to slowly rotate it like a rotisserie while tilting it at an angle with the bottom portion positioned over the flames. Eventually steam rises out of the mouth of the bottle so you need to be careful when handling it. You may notice that the bottom shrinks slightly once heated. One simple guide to determine when food is fully cooked is when transparent meat becomes opaque, and opaque vegetables become transparent. Cook time is about 20 minutes. This method can also be used to make safe drinking water. For more details on this method, see my blog Plastic Bottle Cooking – With A Twist.
|


Outstanding cooking ideas! So imaginative…many are new to me. Thanks.
I have made “trailstoves” for years using a coffee can…commonly called hobo stoves. Use a can punch/bottle opener to make a series of holes along bottom and make a big hole on one side of the already opened end to act as an exhaust. Leave the rim of the can intact to hold your pot or use green twigs or a cut up coat hanger to make a grill. Great site!